How to Empty RV Holding Tanks Without Stress: Beginner Dumping Guide
Learning how to empty RV holding tanks can feel intimidating the first time, but the process is much easier when you follow a simple order. The key is to use the right sewer gear, make secure connections, dump the black tank first, dump the gray tank second, and rinse everything before you store it.
This beginner guide walks you through dumping RV tanks step by step, including practical RV black tank tips for beginners, common mistakes to avoid, and RV sewer tips that help keep the job cleaner and less stressful.
How RV Holding Tanks Work
Most RVs have separate tanks for fresh water, gray water, and black water. When people talk about emptying RV holding tanks, they usually mean dumping the gray and black tanks at an approved dump station or campsite sewer connection.
| Tank | What It Holds | Beginner Note |
|---|---|---|
| Fresh water tank | Clean water for sinks, shower, and toilet when not connected to city water. | You do not dump this into a sewer inlet. It drains separately if needed. |
| Gray tank | Water from sinks and shower. | Dump this after the black tank to help rinse the sewer hose. |
| Black tank | Toilet waste and toilet paper. | Dump this first, and use plenty of water to help waste move out. |
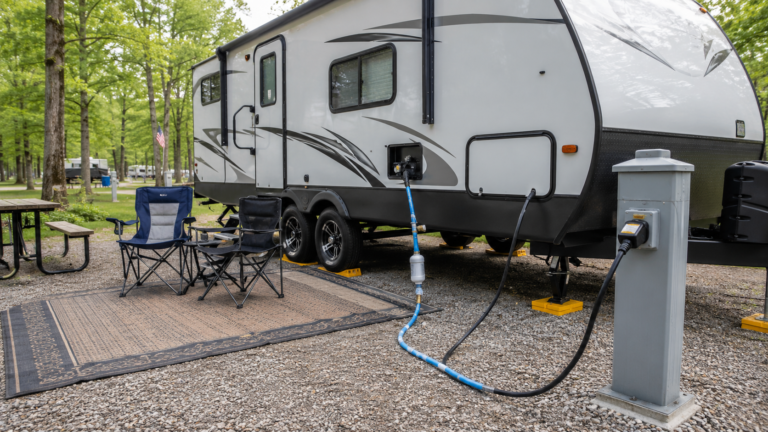
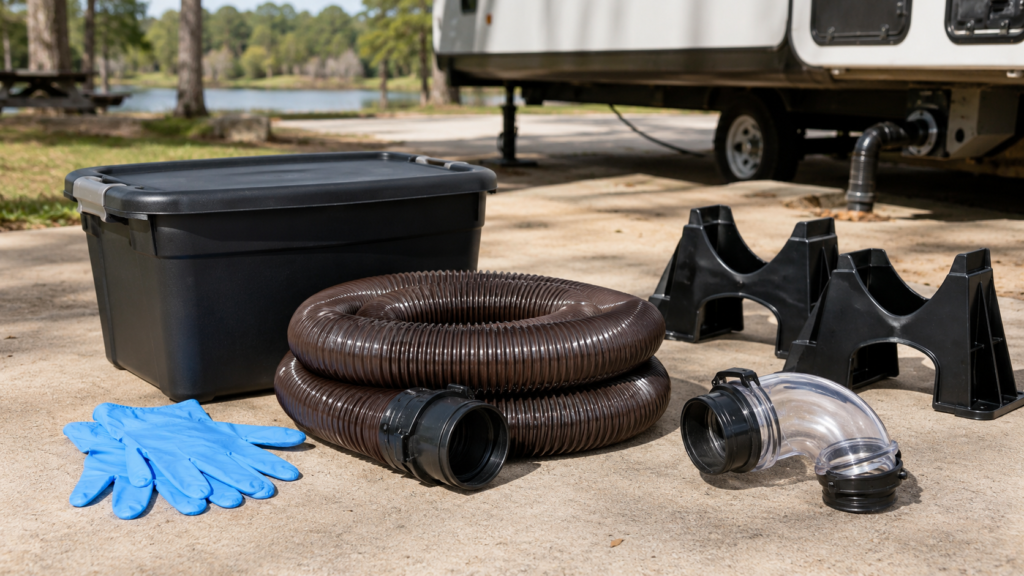
Before You Dump: Beginner Sewer Kit Checklist
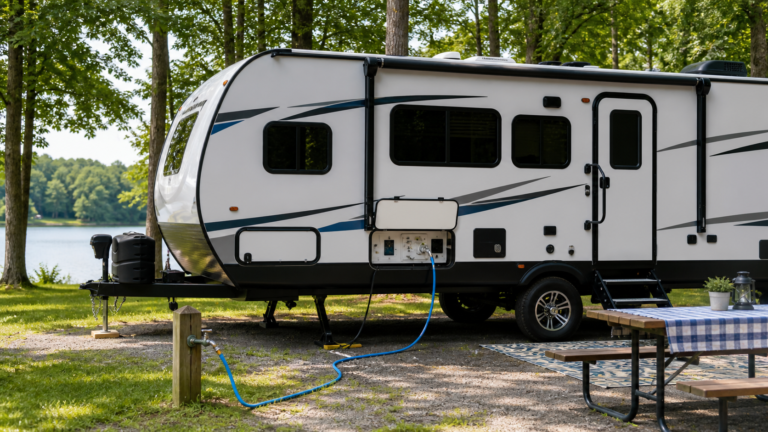
Before you open any valve, get your dump gear ready. A calm setup prevents most spills, leaks, and panic moments. Keep these items together in a dedicated sewer storage bin or RV sewer compartment so they do not mix with your fresh water gear.
| Item | What to Check | Why It Matters |
|---|---|---|
| RV sewer hose | Look for cracks, pinholes, weak fittings, or missing caps. | A damaged hose can leak once the valve opens. |
| Clear elbow or adapter | Make sure it fits the dump station or sewer inlet securely. | A tight connection helps prevent splashing and sewer gas odors. |
| Disposable gloves | Put them on before touching sewer fittings. | Dumping is cleaner and safer when you avoid direct contact. |
| Sewer hose support | Use it when needed to create a steady downhill path. | Good hose slope helps tanks drain more smoothly. |
| Non-potable rinse hose | Use only where allowed and never mix it with your drinking water hose. | Keeps sewer cleanup separate from fresh water equipment. |
| Tank treatment | Use only products compatible with your RV and follow label directions. | Can help control odor when used correctly. |
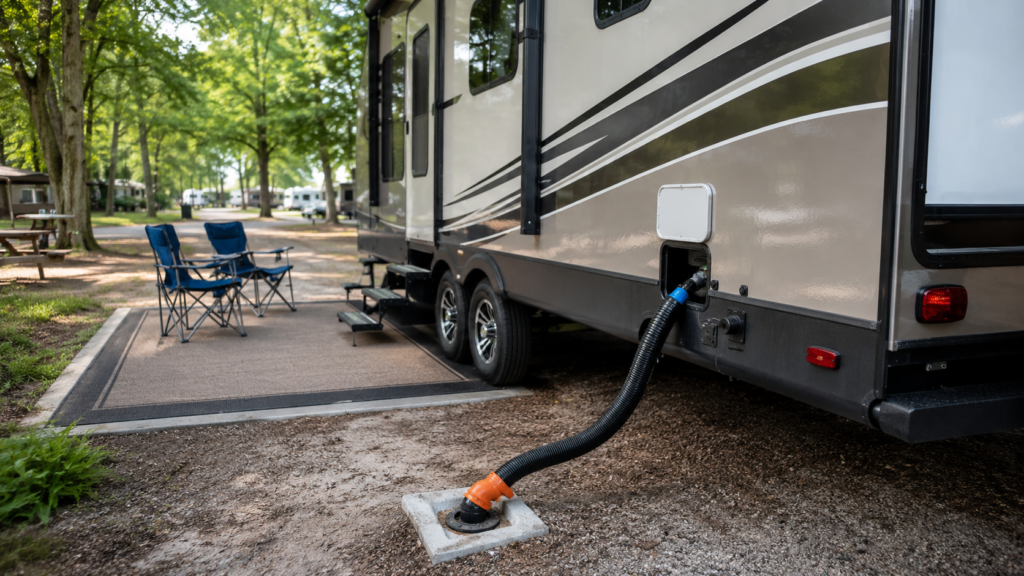
The Right Order for Dumping RV Tanks
The safest beginner routine is simple: connect first, dump the black tank, dump the gray tank, rinse, close everything, and then disconnect. Dumping the gray tank after the black tank helps rinse toilet waste residue out of the sewer hose.
| Order | What to Do | Beginner Tip |
|---|---|---|
| 1 | Connect the sewer hose securely. | Check both ends before opening any valve. |
| 2 | Open the black tank valve. | Let it drain fully before moving on. |
| 3 | Rinse or flush the black tank if your RV has a built-in flush. | Follow your owner’s manual and never leave the flush unattended. |
| 4 | Close the black tank valve. | Confirm it is fully closed before opening the gray valve. |
| 5 | Open the gray tank valve. | Gray water helps rinse the sewer hose after black water. |
| 6 | Close valves, rinse hose, and store gear. | Keep sewer gear away from drinking water gear. |
How to Empty RV Holding Tanks Step by Step
Use this step-by-step process the first few times you empty your tanks. Once you have done it a couple of times, it will feel much more routine.

- Park safely near the dump inlet. Make sure the RV is positioned so your sewer hose can reach without being stretched tight.
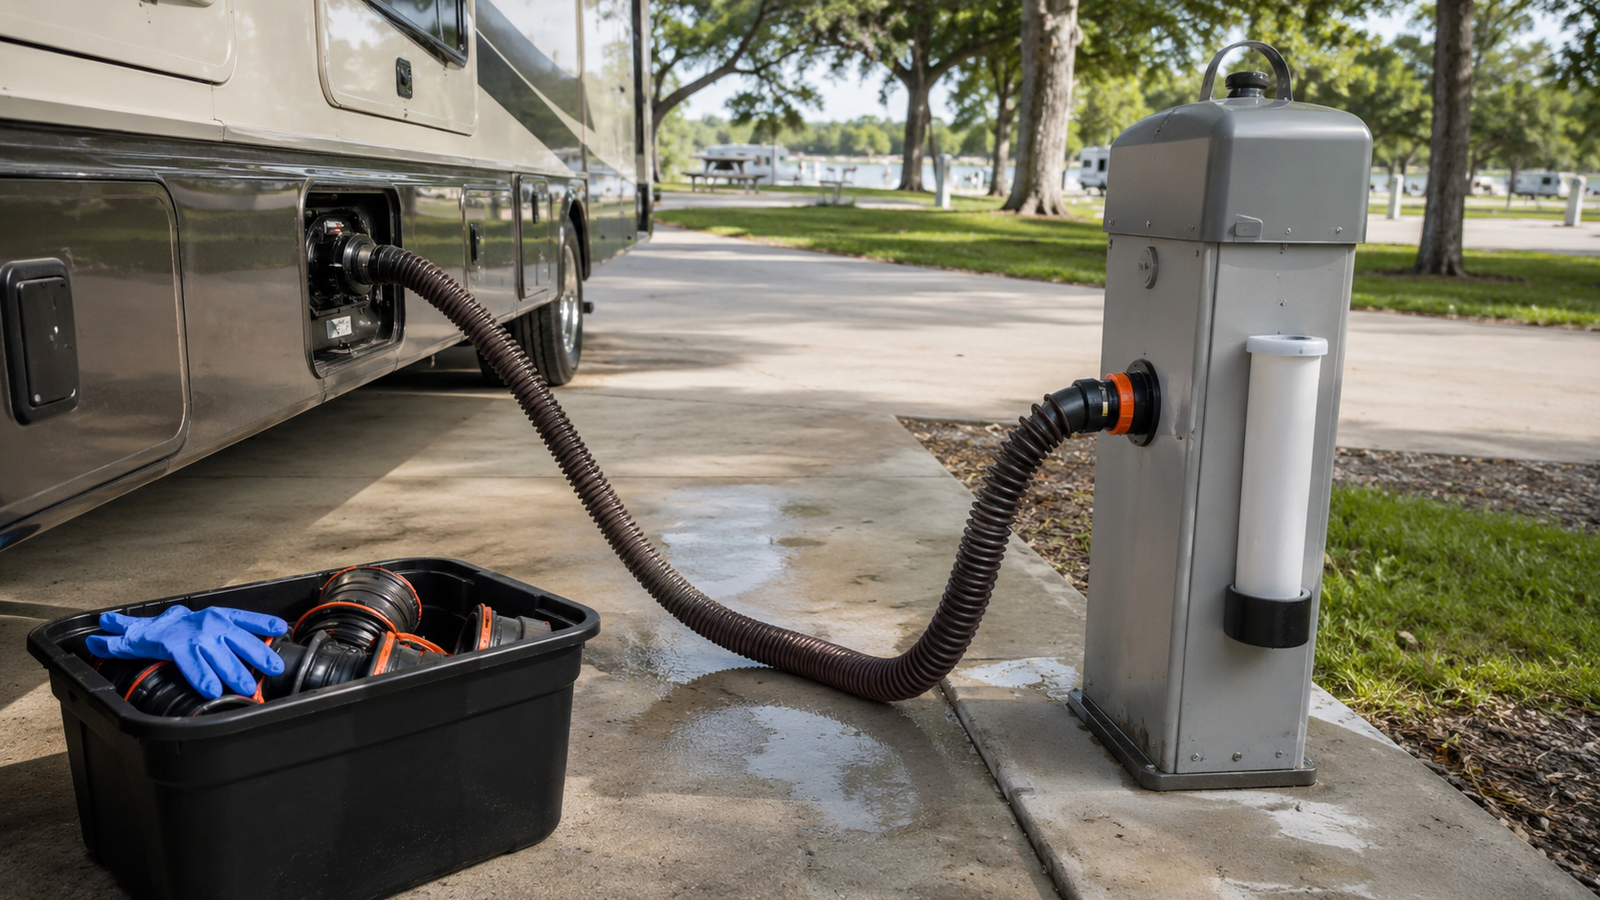
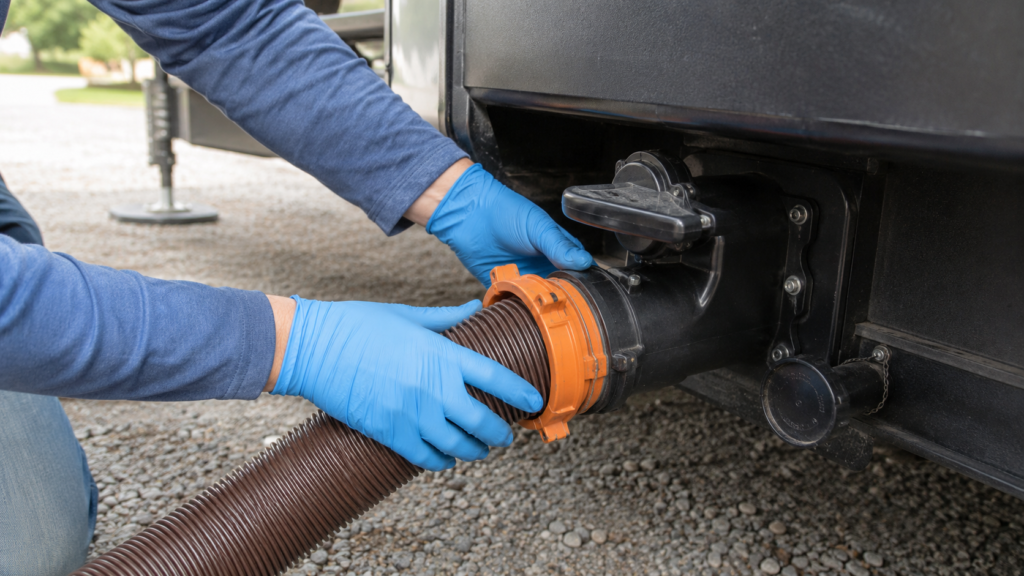
- Put on disposable gloves. Treat every sewer fitting as contaminated, even if it looks clean.
- Remove the sewer outlet cap carefully. Stand to the side in case a small amount of liquid is behind the cap.
- Connect the sewer hose to the RV outlet. Twist or lock the fitting into place so it feels secure.
- Connect the other end to the dump station or campsite sewer inlet. Use the correct adapter, and make sure the connection is stable before opening a valve.
- Open the black tank valve first. Let the tank drain until the flow slows down or stops.
- Use your black tank flush if your RV has one. Follow your owner’s manual. Keep the black tank valve open while flushing unless your manufacturer says otherwise, and do not walk away while water is running.
- Close the black tank valve. Confirm it is fully seated before opening the gray tank valve.
- Open the gray tank valve. Let the sink and shower water rinse the hose as it drains.
- Close the gray tank valve. Make sure both black and gray valves are closed before disconnecting.
- Rinse the sewer hose if the station allows it. Use non-potable rinse water only, not your fresh drinking water hose.
- Disconnect, cap, and store the hose. Drain the hose as much as possible, cap the ends, and store it in a dedicated sewer storage area.
- Add water and treatment to the black tank if needed. Many RV toilets and tanks work better when the black tank starts with some water in it. Follow your owner’s manual and tank treatment instructions.
RV Black Tank Tips for Beginners
The black tank is the one that worries most new RVers, but it is manageable when you use enough water and avoid shortcuts. The main goal is to prevent solids from drying out, sticking to the tank, or building up near the drain.
- Do not dump a nearly dry black tank if you can avoid it. Liquid helps carry solids out through the sewer hose.
- Do not leave the black tank valve open at a full hookup site. Leaving it open can allow liquids to drain away while solids stay behind.
- Use plenty of water when flushing. More water usually means fewer clogs and less odor.
- Only flush toilet waste and RV-safe or septic-safe toilet paper. Do not flush wipes, paper towels, feminine products, grease, food, or trash.
- Do not rely completely on tank monitor lights. Sensors can read incorrectly if residue builds up inside the tank.
- Use tank treatments carefully. Choose products that match your RV system and follow the label instead of guessing.
Dumping RV Tanks at a Full Hookup Campsite
Full hookups make RV camping easier, but they do not mean you should leave every valve open all weekend. One of the most important RV sewer tips is to keep the black tank valve closed until you are ready to dump. This allows enough liquid to build up so the tank drains better.
Many beginners also keep the gray tank closed until dump time, especially before dumping the black tank. That way, you have gray water available to rinse the sewer hose after the black tank drains. If you choose to leave a gray valve open for longer stays, check campground rules and make sure your sewer hose has a proper slope and secure connection.
Common Beginner Mistakes to Avoid
Most messy tank problems come from rushing, opening valves in the wrong order, or using a loose connection. This table gives you the better habit to build from the start.
| Mistake | Better Beginner Habit |
|---|---|
| Opening a valve before the hose is connected. | Connect and check both ends of the sewer hose first. |
| Dumping the gray tank before the black tank. | Dump black first, then gray to help rinse the hose. |
| Leaving the black tank valve open at full hookups. | Keep it closed until the tank is ready to dump. |
| Using your fresh water hose for sewer cleanup. | Keep a separate non-potable rinse hose for sewer tasks. |
| Forgetting to close valves before disconnecting. | Check black and gray valves before removing the hose. |
| Dumping anywhere that is not approved. | Use only approved dump stations or campground sewer connections. |
Troubleshooting Problems While Dumping RV Tanks
If something does not seem right, slow down and avoid forcing valves or fittings. Close the valve when it is safe to do so, check the connection, and follow your RV owner’s manual for your specific system.
| Problem | What to Check | What to Do |
|---|---|---|
| Slow draining | Hose slope, kinks, or a partly closed valve. | Adjust the hose path and make sure the valve is fully open. |
| Bad odor after dumping | Dry tank, open valve, loose cap, or dirty hose. | Add water to the black tank, close valves, and check seals. |
| Leak at connection | Loose fitting, worn gasket, or damaged hose end. | Close the valve if possible, reseat the fitting, or replace the gasket. |
| Tank monitor still reads full | Residue on tank sensors. | Rinse the tank if your RV allows it and avoid relying only on sensors. |
| Black tank clog | Too little water, too much paper, or improper flushed items. | Use RV-safe methods from your owner’s manual. Avoid harsh drain chemicals unless approved for your system. |
Quick RV Sewer Tips for a Cleaner Dump Day
These small habits make dumping RV tanks easier and help keep your storage compartments, campsite, and hands cleaner.
- Keep sewer gear in a separate bin or compartment from fresh water hoses and drinking water fittings.
- Use clear sewer fittings if you want to see when the tank has finished draining.
- Check campground and dump station rules before rinsing tanks or hoses.
- Keep extra gloves, sewer caps, and gaskets in your RV.
- Wash your hands thoroughly after dumping, even if you wore gloves.
- Empty tanks before long-term storage so waste does not sit in the system.
- Check your owner’s manual before using built-in flush systems, tank treatments, or cleaning products.
Frequently Asked Questions About Emptying RV Holding Tanks
How often should beginners dump RV tanks?
It depends on tank size, how many people are using the RV, and how much water you use. As a beginner rule, monitor your tank levels, avoid overfilling, and do not dump the black tank when it is nearly dry unless you add enough water first. Many RVers dump before leaving a campground if the tanks are full enough to drain well.
Should I dump the black tank or gray tank first?
Dump the black tank first. Then dump the gray tank. The gray water helps rinse the sewer hose after the black tank drains.
Can I leave my black tank valve open at a full hookup site?
No, beginners should not leave the black tank valve open. Keeping it closed allows liquid to build up, which helps toilet waste and paper move out when you dump. Leaving it open can lead to buildup and odors.
Do I need RV tank chemicals?
You may choose to use a tank treatment for odor control, but follow your owner’s manual and the product label. Do not mix random chemicals or use harsh cleaners unless they are approved for your RV plumbing and tank system.
Can I dump gray water on the ground?
Use approved dump stations or campground sewer connections unless local rules specifically allow another method. Gray water can contain soap, food residue, and other contaminants, so do not assume it is okay to drain it on the ground.
What should I do after dumping my RV tanks?
Close both valves, rinse and drain the sewer hose where allowed, cap the hose ends, store sewer gear separately, remove gloves, and wash your hands. Add water and treatment to the black tank if your RV setup calls for it.
Related Beginner RV Articles
- RV Hookups for Beginners: Water, Electric, and Sewer Explained
- How RV Fresh Water, Gray Water, and Black Water Tanks Work
- Essential RV Gear for Beginners
- RV Campsite Setup Checklist for Beginners
- Common RV Water System Mistakes to Avoid
Final Thoughts on Emptying RV Holding Tanks
Emptying RV holding tanks is not the most glamorous part of camping, but it does not have to be stressful. Use the right gear, make secure connections, dump black first, dump gray second, and keep your sewer equipment separate from your fresh water supplies.
After a few trips, dumping RV tanks will feel like another normal campsite routine. Go slowly, follow campground rules, check your owner’s manual when your RV has a specific system, and build habits that keep the process clean and predictable.